Monday, August 27, 2012

2NE1 Minzy [I AM THE BEST VR]

Looking for tutorials? Go to the Index to find them!

This is one of my WIP. Currently in the planning stage.

Reference Pictures


Friday, August 24, 2012

Mod Podge

Mod Podge is a clear white primer/finish that you can paint on surfaces to, well, prime or finish. It is also very sticky, so you can also use it to help glue things together.

There are two types of Mod Podge that you can use: Matte or Gloss. I was really curious as to the differences on camera between Matte and Gloss finish, so I have the images below. The left is the matte finish and the right is the gloss finish.

Depending on how you want your prop to look, buy the appropriate finish.

Without Flash

With Flash

--Go to Index


Craft Foam

I might sound really stupid for saying this, but I first though craft foam was something that was mystical and all-powerful. (Mainly because whenever someone had a question about armor, most people said, "use craft foam! It works for everything!") I figured it'd be something impossible for me to find on my own and this was one of the main reasons I was discouraged.

And then, someone posted a picture and everything in the universe made sense.

This is craft foam:
They are those foamy sheets that you can find at Walmart or JoAnns, near the glitter and the kids' projects. I had some sitting in my basement that I had used on some prototype Chii persocom ears. I was mighty embarrassed to realize what they meant, and then I started planning my first cosplay. (Seriously.)

Pros of Craft Foam

  • Easy to use
  • Cheap
  • Can be molded using heat
  • Comes in many colors
  • Soft
Cons of Craft Foam
  • Not nearly as sturdy as some other products
  • May need to buy very large sheets

Prepping Craft Foam for Painting
All you need to do to paint craft foam is paint a few layers of gesso or Mod Podge on top to cover up the porous layers. Then, feel free to paint.

There are very helpful craft foam tutorials found on the Miscellaneous Tutorials page. They will help you out as you work with craft foam.

Good luck!

Cutting Tools

You'll need to have some sort of tools to cut and tear apart whatever you are using. These are the tools I recommend having around while you are making your cosplay.

X-Acto Knife
  • I don't know what I would've done without my X-acto knife. It cuts through everything. Everything. I have used it to cut through my paper mache, my poster board, dried Model Magic, and whatever else I needed to cut through. It is very precise and will slide through a lot of paper-like materials.
  • The only problem with it is that it's hard to make small curves with the X-acto knife, but if you make small incisions as you go, it still looks really clean.
  • You can buy these at Walmart or craft stores. It's not that hard to find them, which is always a plus.

Non-fabric Scissors
  • Just buy a pair of scissors from Walmart if you don't have one at home.
  • You will use this scissors to cut anything that IS NOT fabric that can be cut by a pair of scissors.

Fabric Scissors
  • These scissors will have a flat bottom and help you cut straighter lines. They'll look at little like this:
  • You will use these scissors to cut fabric and nothing else. Understand? Nothing else.
    • The point for this is that cutting anything other than fabric with these scissors will dull them out. Cutting fabric with dull scissors is very frustrating. Save yourself the stress.

Seam Ripper
  • When you make a mistake when you sew, using a seam ripper will be a lot more useful than using a pair of scissors. They are really cheap and a ton of help while you're sewing.

I currently own all of the above, but I also plan to buy these cutting tools in order to help with prop making and other miscellaneous projects.

Box Cutter/Utility Craft Knife
  • It looks like if you want to carve larger props, you'll need one of these. Carving with an X-Acto knife on a big and thick piece of foam will take forever. They called it a utility craft knife. I think it looks like a box cutter.

Paper Mache

It's not anything fancy. It's the same old stuff you used when you were a kid.

Pros of Using Paper Mache
  • Dirt cheap
  • Can make using things at home
  • Lightweight
  • Easy to clean up

Cons of Using Paper Mache
  • May have a lumpy finish
  • Need to have some sort of pattern ready to use on
    • Using balloons for shoulder guards, etc
  • Could possibly mold if too impatient

Typical Paper Mache Mix
There are a TON of ways to make your Paper Mache mix. Some people use a flour/water mixture, others use watered down elmers glue, and some people use wallpaper paste.  I've heard that wallpaper paste helps it become smooth. However, you can also just dip your hands in your paste and smooth over any rough edges on your finished product. Worked just fine for me.

For the flour/water mixture, I think I used about a 1:1 ratio of flour/water. I mixed it well with a whisk and, if the mixture was too thick, added a little water. This mixture can be held in a covered plastic container for a few days before molding.

When using flour/water mixture, you have to make sure that you let it dry every 3-4 layers you put on. Less, if you have the patience. Otherwise, it might mold and that would be gross. Don't let it dry someone dark and damp too...

Paper for Paper Mache
Newspaper is the standard. Use the free paper that comes in your mail and you'll be good to go. You can cut it into small squares if you have a more complex piece, but 1 inch strips should be fine for basic shapes.

I've also read that using phonebook paper is also a good option if you have extra Yellowbooks hanging around. Yellow pages and white pages have different textures as well. I heard that white pages are a little stronger and sturdier than yellow pages, so maybe finish the last few top layers with that. I haven't used a phone book for Paper Mache yet, but I'll keep you posted if I do!

You can also use more expensive options, such as computer paper or tissue paper... if you want.

Additional Reading
If you want to read up some more on paper mache specifics, here are some really good tutorials that I found.  It really is as simple as Paper Mache though. ^_^


Model Magic

(Notice: I haven't used Sculpey or any type of baked clay yet. I will update as I learn more.)


I have used Model Magic on the earrings, the mask, and dagger for my San cosplay and I must say that it can be some really useful stuff. I chose to start with Model Magic because I needed something super lightweight for San's earrings and I just ended up having a lot of it over.

Where to Buy Model Magic

  • Craft stores (Michaels, JoAnns, Hobby Lobby, etc.)
  • Walmart


Pros of Model Magic

  • Lightweight
  • No need to bake in oven
  • Comes in large tubs if you need a lot
  • Sticks to itself and not to you
  • To connect two pieces of Model Magic, you can simply press and hold them together for awhile as long as it is not dry
  • Can paint after prepping with gesso or model magic

Cons of Model Magic
  • Stays soft and pliable for a LONG time (so you will want to be careful about putting any sort of pressure on it because it will fold to any pressure)
  • Cannot be sanded
  • Can crack while drying
  • Not meant for serious detailing

I've read that most people use Model Magic for smaller items and accessories that don't need a lot of detail as well. Princess Mononoke's San isn't particularly difficult which could explain why I didn't have trouble using Model Magic.

The Blog

Why did I create this blog?

I am, by no means, a master cosplayer nor am I claiming to be one. I made this site as a fellow learning cosplayer for other learning cosplayers. There is a vast storage of knowledge of cosplaying located online and everything can seem terrifying to try and master. Or maybe it seemed like too much work.

I know. I was a little afraid/lazy myself.

As I learn more and understand more and figure out how to communicate better, I will update the blog. This isn't one of those "this is how you should do it" cosplay tutorial blogs. This is a blog that will continue to grow and manifest as I learn more and as you learn more. As I find tutorials that I thought was helpful, I'll upload it onto the general tutorial page and let you know about it too!

Feel free to contact me if you have suggestions or just write it in the comment box below the blog post. I'll make sure to credit you and we'll make this a success!

Contact :: diu07921@yahoo.com

Jill Valentine Costume

Jill Valentine is another easy cosplay to do. You can feel free to make a skirt, but I just used some dark colored shorts that folded over and I feel like it has the same effect as her skirt. (I'm naturally a klutz in a skirt, so I tend to avoid those when I can.)

Here is an example of my cosplay. (Forgive me for the horrible background... I know...)


Tube Top
Materials
  • XXL Blue t-shirt from Walgreens (or any XXL blue t-shirt)
  • Well-fitted t-shirt
  • Thread
  • Sewing Machine
  • Elastic (optional)
    • The elastic will help the tube top stay on your body. This is especially helpful for flat-chested people (such as myself) so you don't have to pull your tube top back up your body all the time.

1) Flip the XXL t-shirt inside out and cut across the shirt directly below the armpits. (red line)

2) Take your well-fitted shirt and fold it over directly below the armpits. (Essentially, you're doing the same thing above, except folding it instead of cutting it.) This will be your pattern.

3) Lay your fitted shirt over the XXL shirt, having the bottoms of both shirts meeting. We're doing this so we can use the finished edge of the XXL t-shirt instead of having to do it ourselves. Trace around your fitted shirt. (red line)

4) Add a seam allowance by tracing outside that red line by 1/2 an inch or so. (gray line)

5) Now cut along the seam allowance (gray line) and you should have two pieces of fabric. One will have the markings of your seam allowance and the other will not. You can either attempt to retrace the seam allowance or sew the one with the drawn lines first and then, after lining up the bottoms of the fabrics, pin the blank piece of fabric so that you can sew the same amounts.

6) While the right sides of the fabric are still together, sew up along the length of fabric. Remember to backstitch where you start your stitches and where you end them. (Ignore the green dashed line. Sew along the yellow line.)


7) (Optional: Elastic) Before you start sewing, take out your elastic and measure it around your body underneath your armpit. Make sure that you make it snug. Not too loose, not too tight. Once you've got it right, mark where you're going to cut the elastic and cut it.

7a) Now, length wise, fold the elastic in half and in half again. Mark the points where the elastic bends and you should have three marks. (elastic is black, marks are red)


7b) Do the same on  the pieces of your fabric. (This should be easier the seams on the sides will count as a mark.) Fold your fabric in half and mark (on both pieces of fabric) where the creases are. You have divided both your elastic and your fabric into fourths. Match up the marks on the fabric with the marks in the elastic and pin. Pin the elastic near the top of the pattern line.

7c) Sew the elastic onto the fabric, remembering to pull the elastic as you sew so both the elastic and the fabric are flat. Make sure to back-stitch at the beginning and end of your sewing.

If the elastic steps don't make sense to you, please refer to this video

8) Fold over the top of the fabric (wrong sides together) on the line of the pattern (red line). Since this is the opening of your tube top, you'll want to separate the two fabrics from each other and then fold. Pin the fabric down and stitch. (green dashed line)


9) Voila, you're done with your tube top!

Where to Buy Holsters
I bought my holsters off of Amazon. I spent about $40 on them. I bought shoulder holsters, a belt, and thigh holsters. 

Boots
Although my boots aren't shown, I bought them from Charlotte Russe for $20 when they had a fantastic sale. Make sure you wait for those sales!!

Good luck on your cosplay!


Wednesday, August 22, 2012

Misty Costume


Misty is a relatively easy character to recreate. You can do a number of things to make her as realistic as slutty or as accurate as you want. For her cosplay, I essentially used things I already owned. She's a great start for a beginner and is fairly iconic, so most people will know who you're trying to emulate!

Shirt - I bought her shirt from Forever 21. During the summer, they have a ton of bright neons that you can use for cosplay.


Shorts - An old pair of jean shorts I had. If you don't have a pair of jean shorts that roll up like that, you can easily make one by cutting up an old pair of jeans and rolling the fabric.

Suspenders - Hot topic. I think Claire's sells them too, but not in normal colors (mostly dumb things like skulls and flowers and Big Time Rush)

Shoes - Got them at sale at Sears. They're just red Keds and I used a shoe lace tutorial to figure out how to tie my laces so that they were straight like in the anime. Click here for the tutorial.


General Tutorials

Other Tutorial Lists
Cosplay Tutorial Tutorial List (That is doubled on purpose)
Cosplay Tutorial FAQ List
Kamui Cosplay Tutorial List (Includes YouTube videos)

Craft Foam Tutorials
Armor Tutorial (OneDelightfulDay)
Armor Tutorial (EntropyHouse)

Electronics Tutorial
Adding LEDs to your Cosplay (Kamui Cosplay)

---Go to Index

Buying Online

So, you don't want to make your costume, eh?

Let me give you my two-cents on it.

I don't like the idea of it, especially if you want to save money. I know that you may not be able to make a Lulu costume or you've got hands for feet and can't sew for your life, but commissions don't come cheap. Don't believe the eBay tempters who say you can have this or that for $50+ unless you know you're willing to put that much  money down plus some for the alterations you will probably need later. Some commissioners will charge you a couple hundred for a costume, depending on how difficult it is and some will overcharge you up the hill. You never know how it'll turn out, and that's the scariest thing. Putting down $20-30 for an eBay wig that may (or may not) come in three weeks isn't as scary as $100-$1000 down for a costume that will take months (or even longer) to complete... if you even get it.

I don't mean to scare you, but I think it's the cheap mother in me that makes me so wary of these sites and commissioners. There are good commissioners out there, but you will need to do your research. It would be horrible if you were to put a lot of money down on a costume and never ever get it.

Still ready to buy a costume? Here are some general tips.

  • Look at the commissioner's work
    • If the costumes they make for themselves don't look that great, don't expect too much more from them.
    • See if they've commissioned for other people and if those people have uploaded photos. What you see will go much farther than what the reviews say.
  • Check out the commissioner's reviews
    • Don't look up one site's reviews. I've heard stories of companies hiring people to SAY good things about them so that their reviews go up. Look around.
    • If there are very positive reviews and very negative reviews, read the negative reviews. See what the commissioner has done wrong and see if he or she has done the same wrong to many people.
  • How do they accept payments
    • Paypal is safe. If they don't accept Paypal, be very wary.
      • Paypal can help refund you if you don't get your costume or wig too. It's a lot safer than giving your credit card number or bank account number to a random person over email or chat.
  • Time
    • You want to make sure you give them enough time. A week before the con is ridiculous, you should give them a few months to prepare your costume. It's tailored specifically for you, so it will take extra time.
  • You get what you pay for
    • When it comes to commissions, you will get a wide range of prices. Don't think that super high prices will get you good quality, but be wary of the very cheap prices. I've heard scary stories about the outfit being too small or too large and the commissioner/company will not accept returns or refunds. 
  • Use common sense
    • Just that feeling in the gut will do. If it sounds too good to be true, then do your research. If it sounds horrible, it probably is. Research, research, research!
Cosplay Tutorial has an excellent article on the pros and cons of making or buying your own costume. Check it out.


Commissioner Reviews

If you're going to go out there and buy from people, you should know their street cred first. I think for a commissioner, you need to know more than price and one review. You need to do extensive review so you don't end up overpaying, never getting your costume, or, worse, both.

I wouldn't recommend buying your costume, but I'd feel bad if I didn't touch this topic. I was young once and was also tempted to buy costumes because I lack the skills to make many of the more technical costumes. I learned to get over it, but if you still have hope in your eyes, please look through these reviews that the coscom community has put together for you.

  • Coscom's Blacklisted Commissioners
    • This means DO NOT UNDER ANY CIRCUMSTANCE GO HERE.
  • Coscom's General Commissioner Review (by user/company)
    • Just because a company gets a lot of A's means that you're going to be like them for sure, remember
    • Also remember that if there are a lot of F's, there is a really good reason for that
    • There are a lot of users that have ratings from A to F, use your judgment
    • And be careful, because I am always worrying about people like you

Where to Buy Wigs

There are a lot of places to buy your wig.
The only place I can tell you for sure where to NOT buy your wig is the Halloween Store.
Just don't.
It's horrible, ugly, and impossible to work with. If you just look at it, you know you can't work with it. So just don't.

The Internet

  • This is the only place I can think of where you can buy custom wigs. Here and maybe vendor booths at a convention(?). I haven't been to a convention in a long time, so I wouldn't know for sure.
  • eBay was my first choice to buy wigs and I haven't had problems since. Here is a list of users I've used and heard good things about
    • rinxinyueyi9896
      • I bought my blonde wig and my pink wig from them. They're fairly good quality for the price (about $25 for each wig). The shipping takes forever, like it normally does when ti comes from China, but I must say the wigs are gorgeous when you pull them out of the bag for the first time.
    • JCPunk
      • Recommended by a user from CosCom
      • They have good priced wigs, and I have heard that the wigs come out soft.
    • Cosplaywig
      • Also have heard good things about this eBay seller from various CosCom users
    • Just be careful, all right? With eBay buyers, you never know. Just be careful, folks.
  • Cosplay.com
  • Cosworx
    • I've been wary of Milanoo since forever.
    • Be careful. There are super mixed reviews all over the Internet.
    • Be very careful.

Types of Wigs

Unless you're doing a rather normal looking character, I'm sure you'll be purchasing a wig from somewhere. Now, there are several types of wigs, and there are various things you can do with those wigs. You can buy some pre-styled, ponytail/pigtail extensions, and so much more. It can be a little daunting.

I'm under the impression that I own kanekalon wigs (but ebay hasn't specificed. It says "100% heat resistant fibers" on the page, which doesn't ensure kanekalon, but I haven't had problems with the wigs I've bought before). Again, one day when I have enough  money to wander away from the ebay sellers and get an official kanekalon wig from cosworx or somewhere, I'll update this tutorial. 

I should've asked. ;^;

Before you buy for sure, make sure to ask the sellers what kind of wig it is for sure.

Toyokalon Wigs
  • Soft
  • Tangles less than kanekalon
  • Cosplayers prefer kanekalon
  • May have sheen of satin in pictures
Kanekalon Wigs
  • Soft
  • Silky texture
  • Great shine
  • Can take heat
  • Seems to be cosplayer favorite

A few pictures of my wigs.
They're getting a little frizzy now. (There aren't many tutorials for wavy or curly wigs. ;^;) But I've used them about 5 or 6 times already.

I look so Asian in this one. hahaha.

Here are some more links for reading up on wigs. I know I've just barely touched the surface of wigs, but I have a lot to learn as well. I'll update more as I can. :) Cosplay forums are also a great place to look for what kind of wigs you should buy.

Tristen Citrine Wig Tutorial

The Potion Necklace

This is actually really easy. Don't go out there and spend five to twenty dollars on a necklace you can make yourself!

My tutorial is based off the one I found here, so if you have any other questions, feel free to consult this as well!

Materials

  • Empty potion charms (You can find them in the beading section of Hobby Lobby for sure, but I'm sure they're also at other craft stores. They should have a little loop on the cork so you can wear it as a necklace.)
  • White string
  • Water
  • Food coloring
  • Glycerin (You can find this in the medicine section of Walmart or any supermarket.)
  • Eyedropper
  • Fine glitter
  • Small bowl
  • Spoon


1) To make your potion concoction, mix some water and glitter till it's the consistency that you'd like.

2) Add some food coloring to make the colored potion you want. (I used blue, but you can mix and match as you'd like!)

3) Add a few drops of glycerin and mix well. (The glycerin helps the glitter stay suspended longer in the water.)

4) Use your eyedropper to take your concoction and drop it into your potion charms.

5) Close up the charm and put some glue around the edge of the cap so that it won't fall out! Tie some white string in through the loop and you're good to go!

Congrats! You've made your potion!
Do it up!!

Best image I have of my potion necklace.


Back to Link Page

--Go to Index

The Sword and Shield

Starting with absolutely nothing, you can make this shield for about $30-40 and a lot of work. I made this shield in about two and a half weeks.

You can buy most of these things at a dollar store. Hehehehe. ;D

The Shield
Materials
  • 3 posterboard
  • Acrylic Paint (2 blue, red, 2 silver/gray, yellow)
  • Mod Podge (matte and gloss, but just having one and not the other should be fine too)
  • X-Acto cutter
  • Cardboard (or a self-healing mat)
  • Sandpaper
  • Craft glue (or any type of white glue)
  • Superglue
  • Fasteners
  • One sheet of card stock
  • Old newspaper
  • Paintbrushes, something to put paint on (like a paper plate)
NOTE FOR THE CHEAPO'S LIKE ME: Don't throw any of the cardboard away until I say it's okay to (and you don't even have to throw it away then. You can always use it for other projects)

1) Make a pattern for your shield on newspaper (make sure it can fit on the posterboard!). You can either tape two sheets of newspaper together OR you can just make half of the pattern on one sheet of newspaper (if you do this, you just have to trace everything carefully.

2) Trace the pattern onto all of the sheets of posterboard.

3) Cut TWO of these posterboard out. (To avoid anger from family, landlords, etc; make sure that you have cardboard, a magazine, or some self-healing mat to make sure the X-Acto knife doesn't cut whatever is underneath.)

3) Now, carefully peel the paper off of the cut out shield parts (it's possible). You just need to be careful and it should come off easily (I didn't know I could do this the first time, so I had a horrible time sanding the edges. You should do this). This lets you just have the foamboard. Glue the two shield pieces together and you should have something similar to the picture.

4) On the uncut piece of cardboard, draw the pattern for the outer part of the shield. If you don't understand, look at the picture below. You'll notice that the outside is raised more than the rest of the shield. The design for OoT and Twilight Princess shields are different, so make sure you know which one you want! (For those of you who are very OCD about symmetry, math and numbers are your best friend. Measure everything out.)


5) Once you've drawn the pattern on the shield, cut everything out and you should have an outer piece that will go on your shield and an inner part. Don't throw the inner part away. Take the outer part of the shield and roughly trace the inner part onto the shield you've already cut out. (This will tell you where to paint. Your shield should essentially look like the picture above except cut out.) Sand the edges of the shield so they are even.
Put it like this then trace the inner part.
6) Once you have traced the inside of the shield, it is time to paint the part of the shield you made in step 3. Prep the foam with two or three layers of mod podge (or gesso if you prefer), allowing it to dry between each layer. Once it has dried, you can paint on top of it with blue paint. You may need a few coats. Once it is dry, add one or two coats of Mod Podge to finish.

7) Repeat step 6 with the outer part of the shield, painting the top and inner sides only. Below are the two separate pieces.
You bet I worked on the kitchen floor. Hahaha.
8) If you look at the picture above, you'll notice that I have a paper plate with small fasteners that are stuck in the plate to dry. Take the right number of fasteners (I think mine needed 20)  and paint the tops of the fasteners with the same silver/gray color paint you used for the top portion of the shield. Do a finish of Mod Podge on these as well.

9) Now, this is where you need to be EXTRA careful. Once your fasteners have dried, you need to push them into the top portion of the shield. Fold the ends of the fasteners over to keep them there.

10) Once that is done, you can finally glue the top portion to the bottom portion of the shield. I used super glue here to make sure that the ends stayed down.

11) Now for the inner portion of the shield. Make 4 triangles and the upper portions of the shield in leftover foam board (I would recommend you DON'T use the inner portion of the shield for this step.) Prep and paint them like the other pieces.

12) I use the inner portion of the shield to help design the bird design of the shield. Draw (or print, if you can find a good image) the bird onto the cardstock and cut it out using the X-Acto knife.
The actual shield was drying at the time, so I used this instead.
13) Tape the sheet of cardstock onto the actual shield and paint over carefully with red paint. You might want two or three coats. Once you're done, peel off the cardstock. If it's not perfect, you can use a Q-tip to help remove some of the excess red paint and then paint over with some more blue paint using a more precise brush. Once you're happy with your design, paint over that with some more Mod Podge.
Now this is what you should have!
14)  Now you can glue on the triangles and upper portion onto the shield.

15) Finally, paint the edge of the shield silver and the back of the shield blue, remembering to start and finish with Mod Podge. Then VOILA! You've got almost everything done!
Yayyy!

Backstraps
Now most of you will think, "Uhh, how will I carry this thing around?" Great question! My solution will not be okay for LARP or even con-going. It's extremely delicate, but it worked fine for what I needed it for: a photoshoot.

Materials
  • Black craft foam
  • Fasteners
  • Sewing machine
  • Black thread
1) Cut out four identical straps from black craft foam.
2) On two of the straps, sew a straight stitch near the long edges of the craft foam.
3) Glue one sewn strap to one un-sewn strap.
4) Pierce the glued straps with four fasteners (one near each corner).
5) Hot glue/super glue the straps to the back of the shield.
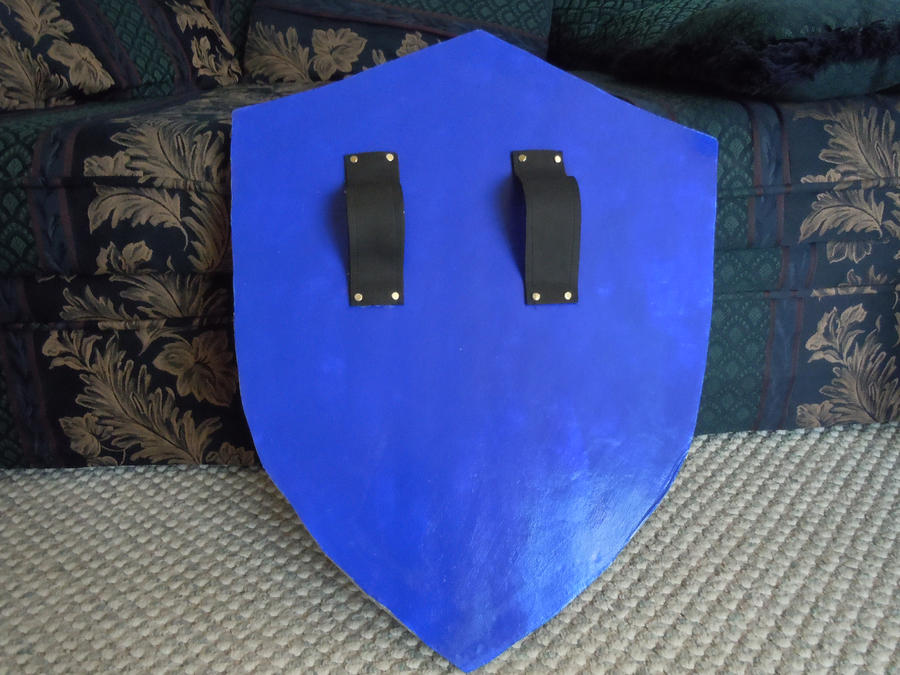


The Sword
I didn't really take pictures as I was making it because this was more freehand than my shield. I will try to explain it to the best of my ability.
Additional Materials
  • 1 poster board
  • Paper towel roll
  • Masking tape
  • Acrylic Paint (a lighter gray and a darker gray)
1) If you want, you can also use the leftover poster board that you have, but your sword will come in two pieces, much like mine. (Hahaha, I really cheaped out on this one.) You'll have to glue the parts of your blade together.

2) Make a sword pattern to use on your poster board. (Below is not to size)
3) Cut out the shapes of your pattern. I forgot to add it, but you'll need TWO sword shapes and not one. Remove the paper parts from all the pieces.

4) For the circles, glue them all together. They should all be the same size. You will be sanding them so they are rounded.This is your hilt. Paint the hilt blue (prep and finish the hilt with Mod Podge!!).

5) Glue the two sword pieces together and carefully shave the edges of the sword off with an X-Acto knife. It will give the sword more depth. Sand it to help even out edges.

6) Paint the sword the same color as the shield. However, for the shaved edges, put a lighter shade of gray on top. It'll help cover any imperfections with the cutting you may have done.

7)Add depth to the triangular part of the sword by shaving off the edges like you did with the sword. Paint same yellow as the triangles.

8) For the wings of the sword, you can press into the foam using a covered marker. Since foam is so soft, the imprint will stay. Paint these as well, as if you want to emphasize the indents, add a little bit of black to the blue and paint the indents.
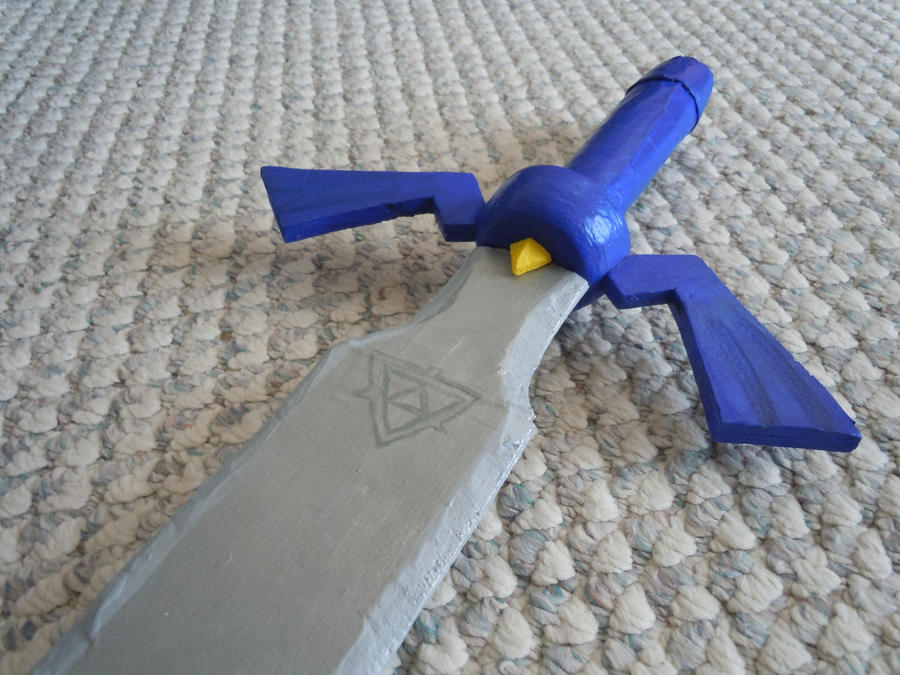
If you look closely here, you can see where I glued the sword together.

9) Finally, take out your paper towel roll. This will be the handle of your sword. Cut down the middle of the tube so you can make the handle thinner. Size it appropriately and then cut where you need to (to make it shorter). 

10) Take the remaining paper towel roll you have and cut a smaller portion off for the end of the sword. One end should be larger than the other (look at the image above to see what I mean) and it should fit snugly against the end of your handle. Tape it so it stays that size. Also add tape to the open end.

11) Now take your masking tape and roll it around the handle of your sword so it looks like you've wrapped it. Once you're happy with your product, paint the handle blue and finish with Mod Podge. Do the same with the end of the sword.

12) Now use some glue to help the end of the sword stick to the handle.

13) You'll need to trace the shape of your handle to the bottom of your hilt. Cut into your hilt so that the handle fits in snugly WITHOUT cutting all the way through the hilt. 

14) Now you have to take the thinner part of your sword (the end opposite of the "blade") and trace the bottom of the thin part of the sword onto the hilt where you want your sword to fit in. Cut that out and you should have cut through your entire hilt.

15)  Push your sword through the hilt and put glue around the parts where the sword comes out through the hilt. This should help it stay.

16) Now put glue on the inner edges of the hilt and put the handle into it. Pray to the gods of cosplay.

17) Finally, glue your little yellow triangle on the hilt and you're done!

Phew.
That took forever.

Next --> The Potion Necklace


Thursday, August 16, 2012

Gloves and Boots

I ended up making the gloves with the leftover fabric from the tunic and the hat. It was essentially just some pointed fabric that I wrapped around my arm and quickly sewed together. Nothing super difficult. I folded in the bottom of the fabric and then did a straight stitch for a nicer finish, then I measured the fabric around my arm and pinned the fabric. After carefully removing my arm, I sewed the fabric shut and I had gloves!

I bought the boots from Charlotte Russe. They had an AWESOME sale where I got about 4 pairs of boots for $60 with free shipping. It was a fantastic deal. (Wait for those deals!) They don't have it on sale right now, but I'm sure that they'll have it restocked soon.


The Hat

To make the hat for this cosplay, I followed this tutorial (with some minor changes to save time and stress). Eressa-sama does a really good job of explaining how to do it. I know that you all probably didn't come here to go look at other pages, but this is really the tutorial I suggest.

Eressa-sama's tutorial: Click here

Next --> Gloves and Boots

--Go to Index

Basic Female Link Cosplay

NOTICE: This method of deconstructing clothes may not work for everyone. I'm on the smaller side and reconstructing XXL male t-shirts from Walgreens works for me. Take a look at the XXL shirts and see if the length works for you depending on your height.

This is how you can make the original design I made for a female Link. I'll show you how I constructed this costume, from the dress to the potion necklace. Let's do it up!

Female Link Cosplay Gallery Here

The Dress
The Hat
Gloves and Boots
The Sword and Shield
The Potion Necklace

I bought the golden blonde wig from this user. I haven't had any problems with buying from this seller and the wigs are moderately priced. Shipping will take forever, but I do recommend this seller if you are looking to buy.

The Dress

Materials
  • 2 XXL Forest Green T-shirts
  • Seam ripper
  • Similar green thread
  • A fitted T-shirt
  • Fabric  marker (or chalk)
1) Use your seam ripper to remove the sleeves from both of the T-shirts
2) Pull your t-shirt INSIDE-OUT. You will have to imagine these images as if you were looking at them from the inside out. Lay your fitted t-shirt over the sleeveless green T-shirt (the fitted t-shirt is represented by the black lines) and mark where the sleeves end on your fitted t-shirt (red dots). I normally tuck in the sleeves of my fitted t-shirt to help determine where the marks should go.
3) Trace the curve of the sleeve of the t-shirt to connect the red dots.
4) Then, continue to trace the t-shirt and extend that line all the way to the end of the fabric.
5) Now, trace another line about 1/2" from the lines you drew as seam allowance. This is the gray line.
6) Now you are going to adjust the sleeves. Compare the sleeve hole of your shirt to the sleeve that you cut off from the t-shirt. Now this will sound confusing, but look at the picture for reference. Look at the bottom mark of the t-shirt and mark that spot on the sleeve. Then make a line parallel to the bottom seam to the end of the sleeve (orange line). Make another line below that line for seam allowance (red line). To the same to the other sleeve.
7) Cut along the seam allowances you made and you should have pieces that look like this (with one extra sleeve, of course)
8) Sew along the blue lines. Do not sew the armholes shut or you will have to do some more seam ripper work. Remember to reverse stitch at the beginning and end of your stitches.
9) You can cut out the neckline of your shirt and do a 2" cut down the center of the shirt. (It doesn't have to be 2", it can be more or less depending on low you'd like the tunic to be in the front.
10) Sew the sleeves to the tunic, right sides of the fabric together (right sides of the fabric = the fabric that will show).
11) Fold the upper collar in towards you (wrong sides together) and sew, following the dotted pink line.
Flip it inside-out. You now have your basic tunic! You can always cut the sleeves and add eyelets, like I did for my cosplay, but here is the most basic part of the dress.

Next --> The Hat